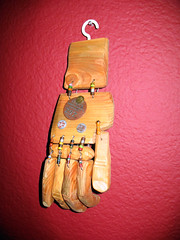
I just made this for my sister, Erin.
Cedar fence posts seem to be a favorite material of mine. You can find some interesting grain and it's cheap as hell. Now that I have a working Craftsmen belt sander, I'm able to smooth them out quite quickly. I've gotten tons of use out of this sander in the past 2 weeks.
Roughing out the fingers on a band saw is easy. I get everything about the size I want and start shaping things over on the sander. (It's on a stand.) I can get all the detail you see here with the belt sander. In the future, I'll try working with a Dremel, but I'm not really looking to make this perfect. It fits more with the story in my head, to keep this as imperfect.
Oddly, I didn't explain this story to anyone who saw the hand in person. While constructing this piece, I had quickly imagined a person in the future needing a bionic hand. Not having the money nor resources, they were outfitted with this second-rate hand constructed of old electronics and discarded wood. At first glance many think the hand is decorated with beads. These are actually old analog electronic resistors.
Sunday, December 28, 2008

Tuesday, November 25, 2008
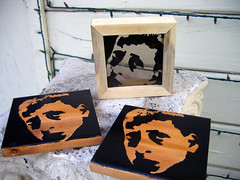
Found Milk
"If a bullet should enter my brain, let that bullet destroy every closet door."
I'm going to a special screening of Milk at the Grove in LA this Tuesday, November 25, 2008. We're lucky enough to get an introduction from producer, Dan Jinks.

I'm going to a special screening of Milk at the Grove in LA this Tuesday, November 25, 2008. We're lucky enough to get an introduction from producer, Dan Jinks.
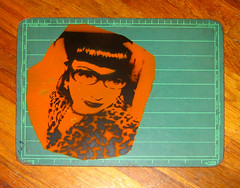
If you happen to be in the theatre with me tonight, you might find one of these images I made of Harvey Milk. I'm hoping you took the time to visit my blog, in order that you can share a little of your story.
If you care to, would you list your image number (oops! I was in a hurry and forgot to number them) and your name? I'd like to know what your thoughts are on whatever issue you'd like to speak. Also, please mention what you were thinking when you found the image. Did you know you were supposed to take it? Let's hear your story. Have at it!
Credit to Joe Sanchez for encouraging me to leave art around for people to find. I know others are doing it as well. I have another image in the works that I will be dropping soon.
I'm calling all the various pieces "Dropped and Found."
Saturday, November 15, 2008
All That and a Bag of . . .
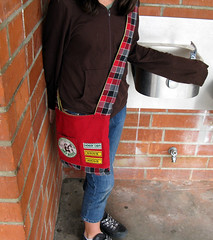
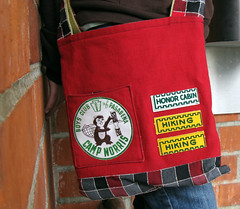
Here we have an unnamed student modeling a bag made for my good friend, Marcella. This bag was tailored after another purse Norma showed me. I did lengthen the bottom by several inches. This gave it a nicer scale than the original one I was shown. Very simple construction; but still, it has a warm quality about it.
The patches work nicely together even though they came from separate estate sales. I had been saving the Camp Norris patch for a while until the leather "Honor Cabin" and "Hiking" came along. Those things are the greatest!
More bags to come. I'll be installing a magnetic clasp and an inside pocket for a cell phone. Last month, I purchased the best vintage fabric ever! I added almost 40 large pieces to my collection and they are ALL amazingly cool. Can't wait to show you!
Thursday, November 13, 2008
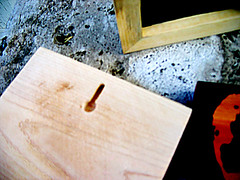
Reclaimed Birthday
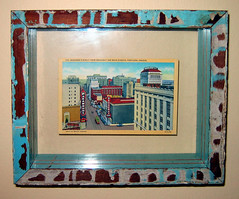
Most of you know I'm at an estate sale quite often. Every now and again I look through the old postcards Cynthia has for sale. I was happy to see a Portland postcard pop up, and I immediately thought of Meesh. I was unfamiliar with the landmarks, but I had an intersection off the postcard's back to go by. Thanks to Google maps, I was able to find it quite easily. However, from the street view, I was disappointed to see that the old Paramount sign had been changed to say Portland. After doing some research, I discovered that the sign originally did say Portland, and my postcard showed the changed version. To be verbose the sign has gone form Portland . . . to Paramount . . . and back to Portland again.
To continue the theme of reclaiming this landmark, I found some interesting reclaimed lumber at another sale. I put my new nail gun to the test and was surprised to find how easy it was to construct this frame with double paned plexi-glass to enable the postcard to float.
Once in Portland, Michelle picked me up at the airport and we went for a great dinner. After, I had her drive me to the intersection listed on the back of the postcard. I was hoping to get near as possible to the perspective shown in the postcard. Michelle was very surprised when I pulled the frame from my backpack, standing nearly in the middle of the street. It now hangs warmly on the wall of her new home.

Here's a shot of Michelle, across the street from the landmark. The building across the way houses some old signs inside and this wonderful wall poster of an even older scene than the one on the postcard. Happy birthday Michelle!
Tuesday, July 29, 2008
Something Fun
They have plenty of cool stuff you can do with your photos.
Haven't had your 15 minutes of fame yet? Try the Warholizer then!
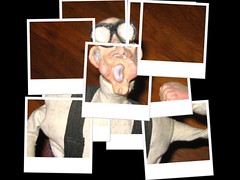
Here's a clay man I sculpted. He even has working suspenders! The Hockneyizer makes it appear as if I shot a bunch of Polaroids.
I think my brother, Dan, will like this work around for a Flickr shortcoming. Check it:
View On Black
Saturday, July 12, 2008
Still Waiting Around
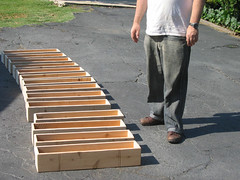
Here I am ready to stain the boxes, before moving on to the complicated stencils. Incidentally, I'm standing in the future spot of my very own regulation-sized four square court. I can't wait to paint that thing and have you people over for a fun party.
It's coming, it's coming!
Flower Bag
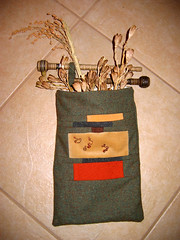
All the material was purchased at garage sales, estate sales, or thrift stores.
The wooden "handles" serve as the hanging device, as well as being visually interesting. I picked these up in Florida years ago while at this enormous outdoor junkyard slash garage sale slash flea market. (I have about 200 more of these spindles, used in textile mills to hold cones of thread.)
While there, I overheard these 2 old biddies walking along the dirt path in their great New York accent, "Oh, Emeril; he's the hottest right now, doncha know!?"
Yes, I can sew . . .

Lest my post title make me sound like a pretentious ass, I must explain. It comes from a little biography story I wrote in my literature class called, "Better Than I Could Do." It was about getting flack for being a boy who could sew. Sure, I'm not the greatest, but I have pushed my creativity in an original direction that I haven't seen elsewhere. (This bag is fairly standard, however. I'll post others.)
Still, when people would see my work and make a big deal because I was a male, they would end with this back-handed compliment, "Well, it's better than I could do!"
Of course it is jackass! You don't even sew!
Come to think of it, I'm sounding like a pretentious ass even with the explanation; so I'll stop here. (It's all in good fun anyway.)
Awe Man!!
We had already printed a stencil or two and decided to try acrylic paint on the plexi. The result was acceptable, but could be made even better if we thicken up the paint. We tried working quickly to construct a frame. BTW, sawblades leave a grove that is the exact thickness of plexi or regular glass sheets. We ran in to a few problems when trying to nail the mitered corners. Later that night I solved the problem by purchasing a band clamp. (Yes, I was the funny man walking around Home Depot saying to himself, "This one time, at band clamp . . .") In this way, I only had to glue up the corners and clamp the entire frame without using any nails. The glue sets up in about half an hour. Again, we used the keyhole router bit to easily make this frame ready for the wall. All this quick work means I can try and get a fair price without running myself ragged.
Tyn, your frame is ready; come and get it!
Sunday, July 6, 2008
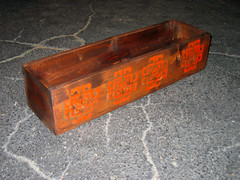
P-P-Palanca
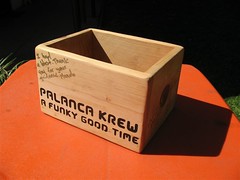

Some of you have been asking about the wedding boxes I created. They turned out amazing, and Luca and Laura were very pleased. It was great practice for me moving towards a deadline while maintaining quality work. Unfortunately, I've been waiting forever to see actual wedding pictures. I'm hesitant to post the few pictures I have of the boxes. I don't think they do them justice.
Sunday, April 20, 2008
It's the New Style; 4 and 3 and 2 and 1 . . .

In order to salvage the box, I had to cover the entire piece with the darker stain. What I found was a happy accident. It looks so nice and even better in person! Using the black paint then, I have a subtle look that is part elegant - part edgy.
Sunday, April 13, 2008
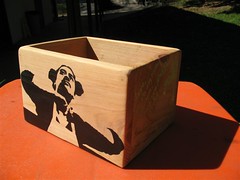
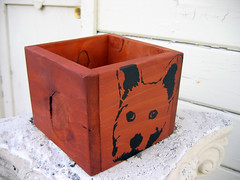
Animal Box
A box I made for a friend rests atop a real-life pedestal in my backyard. I was inspired by the boxes I'm making for the Tunisian wedding. Incidentally, those are working out great, and I have perfected the use of stencils.
This box, unlike the wedding boxes, had mitered corners. This proved a bit trickier, as the cedar is too tall for my chop saw. Thankfully, I have a compound miter saw, and the head can be tilted at a 45 degree angle. Still, it's a bit of a hassle, and makes accuracy a touch harder.
The best part of all this is discovering how easy it is to have a custom stain mixed at Home Depot. It's a hair more expensive than the regular, but it will last a lifetime. I think I could get almost 100 boxes out of a tiny quart!
Be sure to always look in the Oops Basket for cheap paint. I happened to find the exact turquoise I need for the wedding boxes. 1 quart will run you a buck, whereas a gallon costs $5.00.
After finishing the stain, I quickly ran the completed box across the table saw on each side. Move the fence a bit; run it through again, and you've added a nice decorative element. It might be old-hat for veteran wood-workers, but I just discovered it!
I'll be constructing more of these, where I'll go for a more dilapidated look; possibly adding decoupage and stencils combined.
Monday, March 31, 2008
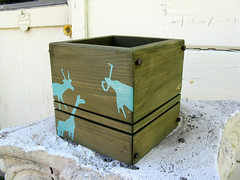
Tunisian Wedding
Something neat happened. It turns out that I popped up on a Google search for "table size planter boxes." Laura wrote me to ask if I could create some planter boxes for her Tunisian style wedding in June.
I made this box tonight to test out some stencil ideas. Keep in mind that I don't really go for the colors of the stencil, but it's a start.
As with out first Happening, I used cedar fence boards (very inexpensive.) But, this time I sanded them and even rounded all the edges. They look good in person.
I found a jpg of a Moroccan motif that was interesting. I brought it into Photoshop, traced the outlines and exported the paths to Illustrator. Using my Silhouette Digital Craft Cutter, I created the stencil. (The easy thing is, now that I have the file, I can cut a new stencil at any size in under a minute.)
After staining the box, I used the stencil twice; once with gold and then a second time with a deep orange. I'll be doing some trials to see what looks good, and I think I'll make them more uniformly spaced with cleaner edges.
Here's a look at the stencil itself. I finally got smart and started wearing gloves when I spray. The big advantage here, is that you're able to hold the stencil flat against the object without worry of spraying your fingers. Luckily, I have almost 100 pairs of surgical gloves I picked up at an estate sale years ago. I knew they would come in handy!
I made this box tonight to test out some stencil ideas. Keep in mind that I don't really go for the colors of the stencil, but it's a start.
As with out first Happening, I used cedar fence boards (very inexpensive.) But, this time I sanded them and even rounded all the edges. They look good in person.
I found a jpg of a Moroccan motif that was interesting. I brought it into Photoshop, traced the outlines and exported the paths to Illustrator. Using my Silhouette Digital Craft Cutter, I created the stencil. (The easy thing is, now that I have the file, I can cut a new stencil at any size in under a minute.)
After staining the box, I used the stencil twice; once with gold and then a second time with a deep orange. I'll be doing some trials to see what looks good, and I think I'll make them more uniformly spaced with cleaner edges.


Here's a look at the stencil itself. I finally got smart and started wearing gloves when I spray. The big advantage here, is that you're able to hold the stencil flat against the object without worry of spraying your fingers. Luckily, I have almost 100 pairs of surgical gloves I picked up at an estate sale years ago. I knew they would come in handy!
Thursday, March 27, 2008
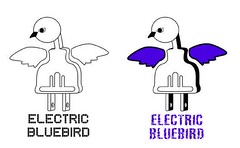
Electricity, Electricity!
This logo came together rather quickly for a seller on Etsy. She was looking for a trade - logo for a knit cap.
I have an old lamp with an art-deco looking plug. It was the natural solution for the electric part of this logo. I realize the blue bird's head is super simple, but I really am a lousy illustrator; so I went with it.
When I sent it to her excited to see it added to blanket and cap tags; I asked her if she wanted the eps file. She let me know that she was just using it to print out a coloring page for her child. Oh well.
Never did ask for that cap!
Tuesday, March 25, 2008
I'm Still Looking For . . .
This student chalk board was purchased from an estate sale and I must have more than 20 of them left. They're the perfect canvas for stenciling.
The stencil was created from a photo of a girl I met on Match.com. I actually met her and some friends at a karaoke bar in Glendale called the Winchester Room. The place is a hoot and left me with an awesome story. You'll have to ask me in person to get all the low-down. Highlights of my very own Twilight Zone episode:
• I wore a sticker that said "I'm Looking For:" with a picture of the girl on it. Awesome!
• She looked nothing like the sticker.
• I got slapped on the back while ordering a drink from the bar. I turned around and yelled, "Cowboy!!"
• I played doubles pool with Cowboy and his tweaker friend. They kicked our ass!
• As I'm sitting with the group of friends, I'm disoriented and confused. I finally realize that the friend I'm sitting next to had written me twice on Match, and I hadn't responded. I felt I was being set up for some bizarre retaliation. It was just the oddest coincidence, though. The friend was from OC and the girl was from the Valley.
• The girl left early. When I asked if everything was OK, she told me she was getting her taxes done early the next day. Nice one; Damn you Uncle Sam!!
I think this stencil kicks ass. I made her photo hi-contrast in Photoshop. Next, I went through, making sure there were no islands that would make printing difficult. The hair highlights and part of the eye were from a separate stencil. I'm still using Adobe Streamline to turn my TIFFs into vector art. (Is there another way? It sucks because I have to use System 9 when using Streamline.) My Silhouette Digital Craft Cutter was used to cut the stencil out of index paper. They've created an Adobe Illustrator plug-in that gets the job done nicely. I used blue masking tape to define the boundaries, tearing the edges to give a more organic look. I think it's very successful . . . well, not the date . . . just the final product.
Saturday, January 26, 2008
Audio Samples
I buy cassette tapes whenever I see them at estates sales. Some are instructional; others are religious. The best are homemade ones that contain hidden treasures. I also buy the shitty $1.99 DVDs and sample from those as well. Check these out - use them in your project - enjoy them. Make it so! (The list of files will continue to grow.)
Friday, January 11, 2008
I Got Flamed at SoCalMtB.com and all I Got Was this Lousy T-Shirt


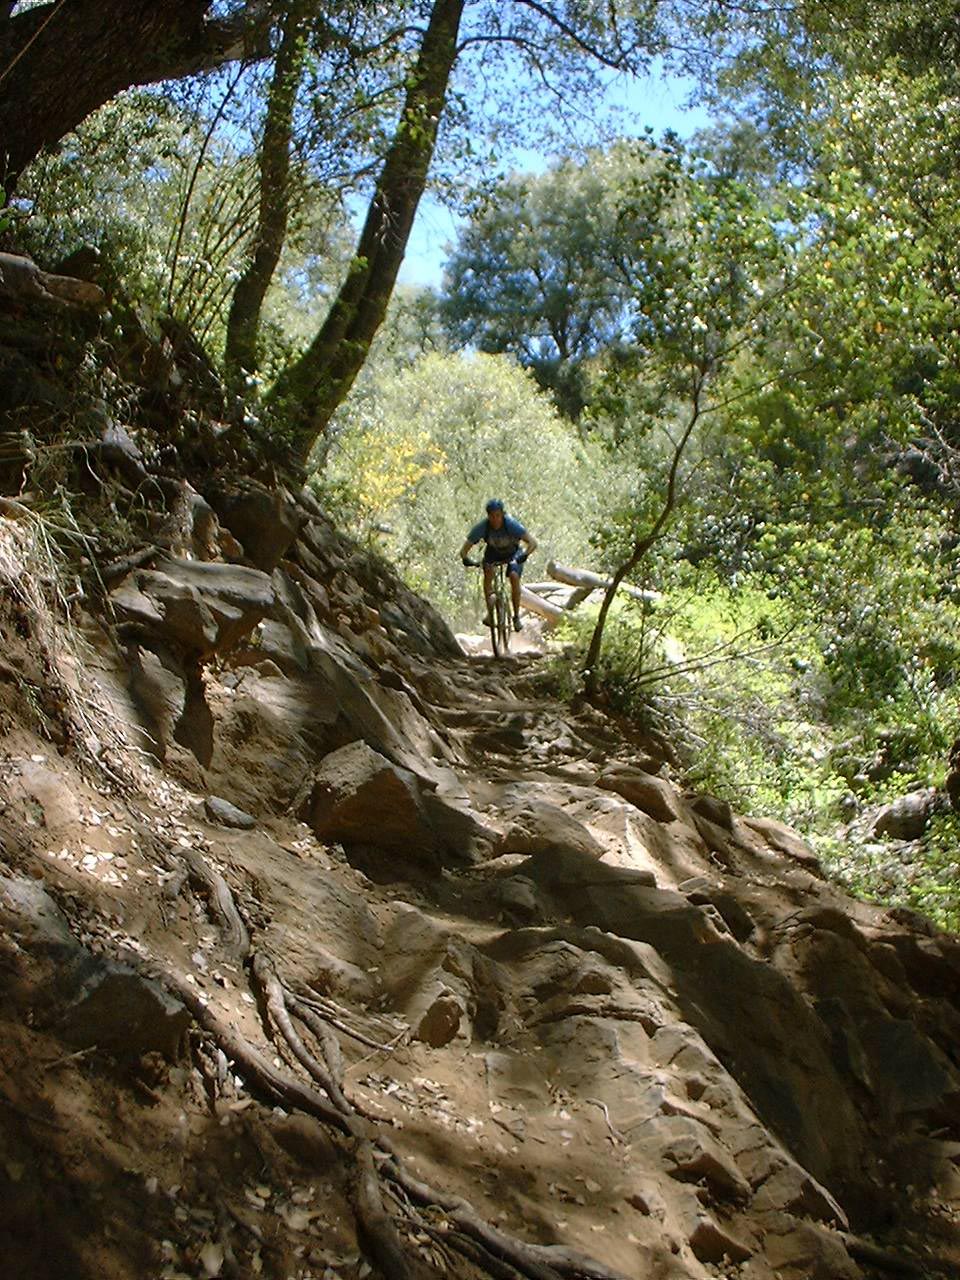
My brother, Dan, invited me on an overnight camping trip with people from SoCalMtB.com. These are the two logos I developed to highlight the event, and the group had t-shirts printed. We ended up using the top logo. Fairly simple design, but at least I got the mountains correct this time. I especially like the use of negative space in this logo. I really had never done anything like that before. Incidentally, this post's title was printed on the reverse of the shirt.
Great fun that weekend as we went on short rides and messed around the campfire with a great potluck dinner. On day two, we all went on a 14 mile downhill ride. Here's a pretty good look at the single track.
We shuttled back to the top, and later devoured an awesome fried chicken dinner in nearby Julian with their famous apple pie for dessert.
Dan and I have since hiked that trail twice. Once for an overnight back back last year.
Thursday, January 10, 2008
Where are they Now?
I believe it has been long enough that I can post these guys. They must be 19 years old by now. The middle photo is a tad cheesy with the outlining and all; but doesn't he have amazing eyes?


Taking Ya Back to the Old School

Cuz I'm an old fool, who's so cool.
Well, maybe. I designed this logo for the City of Azusa Centennial when I was still a brand new teacher. The Associate Superintendent, Nancy Moore, had me working on this thing. I got in a little over my head and was having trouble coming up with a workable logo. She sketched something out on a napkin to get me going, and I came up with this. Far as I remember, everyone loved it. Banners throughout the city sported the logo. (Never got one.) But they did give me a cool little enamel pin. No one ever gave me grief for depicting the San Gabriel Mountains as the Rockies. (Actually, Jim Legg was the clown to point this out; We had a good laugh)
Sunday, January 6, 2008
It Happened in Class (Last Year)
 This kid is awesome! He's an ass-out genius! If "Peter" hears something once, he will remember it - and he'll be able to repeat it verbatim a year later!!
Every week, we take a spelling pretest on Monday and the final test on Friday. When this happens, I'll say something like, "Number one: Bike shop - Peter was fired from his job at the bike shop. Bike shop. Number two: Smoking - We saw Greg, and he was smoking! Smoking. So, I go through our 20 words in this manner and we're all done.
Last year, we took a spelling pretest on a Friday for some odd reason. I didn't assign any spelling packet work that following week. (I can't remember why.) Then it comes time to give the final test on Friday. What I do remember is Peter having to go to the bathroom when I was on number 4. When He comes back, we are on number eleven, and I say, "Peter, don't worry about the ones you missed, I'll give them to you at the end."
When I walk over to Peter to read the words he's missed, I see his paper is complete.
"Peter are you allowed to talk during a test?"
"No, and I wasn't talking."
"Then how did you get the words you missed?
"I remembered them"
"From last Friday?!?!?"
"Yep!"
"Reeaaaallllllly?!?!?"
(taking his paper)
"Then what's number 5?"
"Tarantula"
"Well, what's number 16?"
"Tiki"
"And number 9?"
"Trampoline"
"Huh . . . very well, then . . . carry on."
Friday, January 4, 2008
Lil' Shelf
I constructed this shelf the other day to hold my collection of 35 mm film canisters. Most, if not all, of them are Kodak, and they are made of tin. I've been buying these things for years at estate sales, but hadn't figured out what to do with them until now. I'm really interested in continuing to create works of assemblage. I've categorized my findings, so it is just a matter of choosing which pieces belong together and in which manner they might be altered, if any.
I took a lousy photo of the detail because it was raining today, and I couldn't shoot this in the outdoor light. But the front part of the shelf has knife marks cut in random directions. The wood stain darkened the marks in an interesting way. I'll be thinking how I might continue to use this technique.
Subscribe to:
Posts (Atom)
