Showing posts with label Stencils. Show all posts

Saturday, July 12, 2008

Awe Man!!

keyhole
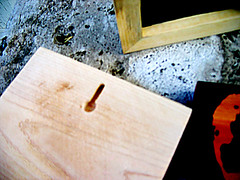
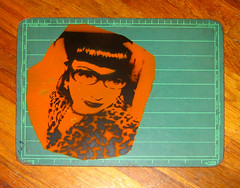
My brother, Dan, will bust my chops for this lousy photo with all its wonderful blur, but we don't all own a DSLR. (Is that a good enough excuse? And hey; unsharpen mask can only take you so far in PS.) This is the only look I have to show you of the new routered keyholes I make for the back of these tablets. These will be the first items I list on etsy. I can make them inexpensively as well as quickly.


gabe
My good friend, Tyn, dropped by my place to see what I'd made of the wood shop and to go over some art projects with me. She's had her etsy shop running for a while now. It's funny how ideas jump out as us. Soon after offering her some extra Plexiglas (that's no typo!) I had lying around, we started talking about how it can be scored and snapped to the correct size or even cut on the table saw. Someone had told me to reverse the blade on my saw in order to not scorch the plexi. Meh! Sounds like too much trouble; so we cut away and everything went fine. It does get a bit messy, though, with the extra stringy plastic. No problems cutting the sheets down to size with the chop saw, either.

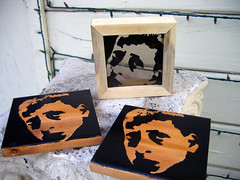
We had already printed a stencil or two and decided to try acrylic paint on the plexi. The result was acceptable, but could be made even better if we thicken up the paint. We tried working quickly to construct a frame. BTW, sawblades leave a grove that is the exact thickness of plexi or regular glass sheets. We ran in to a few problems when trying to nail the mitered corners. Later that night I solved the problem by purchasing a band clamp. (Yes, I was the funny man walking around Home Depot saying to himself, "This one time, at band clamp . . .") In this way, I only had to glue up the corners and clamp the entire frame without using any nails. The glue sets up in about half an hour. Again, we used the keyhole router bit to easily make this frame ready for the wall. All this quick work means I can try and get a fair price without running myself ragged.

Tyn, your frame is ready; come and get it!

Sunday, July 6, 2008

P-P-Palanca

palancaboxfront
Here's a box given to Augie Leyva as a thank you for heading up Palanca for Search 140. It features the ever-popular Josie Leyva imitating Augie's patented funk stroll (complete with afro-puffs to boot!) We all signed the sides with a gold paint pen, and it was a huge hit!


palancaboxback
I love the negative space created by both her forearms. This was the first time I used a more neutral stain. I think it works here, but I still can't be sure I don't want a darker stain for most of my items. This almost looks as if it has no stain at all.


Augie
Rodney and Nella look on as Augie takes it all in. Of course that's me hovering over the unveiling! Thanks once again, Augie, for a Funky Good Time!

Some of you have been asking about the wedding boxes I created. They turned out amazing, and Luca and Laura were very pleased. It was great practice for me moving towards a deadline while maintaining quality work. Unfortunately, I've been waiting forever to see actual wedding pictures. I'm hesitant to post the few pictures I have of the boxes. I don't think they do them justice.

Sunday, April 20, 2008

It's the New Style; 4 and 3 and 2 and 1 . . .


I had a new stain color mixed to add to my collection. (It's a light orange that really isn't as nice as the green.) This time, I tried a stencil of my own, and had planned to print it with a dark cherry stain instead of the black acrylic you see here. It looked amazing, but when I lifted the stencil, I found the dark stain had soaked through the index paper I use for my stencils. (I still haven't found the right thickness acetate sheet.)

In order to salvage the box, I had to cover the entire piece with the darker stain. What I found was a happy accident. It looks so nice and even better in person! Using the black paint then, I have a subtle look that is part elegant - part edgy.


Here's a look at the second box. I was so excited to create it that I forgot to cut a grove in this one. I shopped the top one around at work and have found people to be interested. I'm searching for the right price to charge for a generic box, and for a box with a custom stencil I create based on the photo you supply. I've been working hard at creating more stencils and have 10 originals ready to go. I think I'm on the verge of something big!

Sunday, April 13, 2008

Animal Box

Animal Box

A box I made for a friend rests atop a real-life pedestal in my backyard. I was inspired by the boxes I'm making for the Tunisian wedding. Incidentally, those are working out great, and I have perfected the use of stencils.

This box, unlike the wedding boxes, had mitered corners. This proved a bit trickier, as the cedar is too tall for my chop saw. Thankfully, I have a compound miter saw, and the head can be tilted at a 45 degree angle. Still, it's a bit of a hassle, and makes accuracy a touch harder.

The best part of all this is discovering how easy it is to have a custom stain mixed at Home Depot. It's a hair more expensive than the regular, but it will last a lifetime. I think I could get almost 100 boxes out of a tiny quart!

Be sure to always look in the Oops Basket for cheap paint. I happened to find the exact turquoise I need for the wedding boxes. 1 quart will run you a buck, whereas a gallon costs $5.00.

After finishing the stain, I quickly ran the completed box across the table saw on each side. Move the fence a bit; run it through again, and you've added a nice decorative element. It might be old-hat for veteran wood-workers, but I just discovered it!

I'll be constructing more of these, where I'll go for a more dilapidated look; possibly adding decoupage and stencils combined.

Monday, March 31, 2008

Tunisian Wedding


planter
Originally uploaded by misterbonkers
Something neat happened. It turns out that I popped up on a Google search for "table size planter boxes." Laura wrote me to ask if I could create some planter boxes for her Tunisian style wedding in June.

I made this box tonight to test out some stencil ideas. Keep in mind that I don't really go for the colors of the stencil, but it's a start.

As with out first Happening, I used cedar fence boards (very inexpensive.) But, this time I sanded them and even rounded all the edges. They look good in person.

I found a jpg of a Moroccan motif that was interesting. I brought it into Photoshop, traced the outlines and exported the paths to Illustrator. Using my Silhouette Digital Craft Cutter, I created the stencil. (The easy thing is, now that I have the file, I can cut a new stencil at any size in under a minute.)

After staining the box, I used the stencil twice; once with gold and then a second time with a deep orange. I'll be doing some trials to see what looks good, and I think I'll make them more uniformly spaced with cleaner edges.


Here's a look at the stencil itself. I finally got smart and started wearing gloves when I spray. The big advantage here, is that you're able to hold the stencil flat against the object without worry of spraying your fingers. Luckily, I have almost 100 pairs of surgical gloves I picked up at an estate sale years ago. I knew they would come in handy!

Tuesday, March 25, 2008

I'm Still Looking For . . .


stencil1
Originally uploaded by misterbonkers
This student chalk board was purchased from an estate sale and I must have more than 20 of them left. They're the perfect canvas for stenciling.

The stencil was created from a photo of a girl I met on Match.com. I actually met her and some friends at a karaoke bar in Glendale called the Winchester Room. The place is a hoot and left me with an awesome story. You'll have to ask me in person to get all the low-down. Highlights of my very own Twilight Zone episode:
• I wore a sticker that said "I'm Looking For:" with a picture of the girl on it. Awesome!
• She looked nothing like the sticker.
• I got slapped on the back while ordering a drink from the bar. I turned around and yelled, "Cowboy!!"
• I played doubles pool with Cowboy and his tweaker friend. They kicked our ass!
• As I'm sitting with the group of friends, I'm disoriented and confused. I finally realize that the friend I'm sitting next to had written me twice on Match, and I hadn't responded. I felt I was being set up for some bizarre retaliation. It was just the oddest coincidence, though. The friend was from OC and the girl was from the Valley.
• The girl left early. When I asked if everything was OK, she told me she was getting her taxes done early the next day. Nice one; Damn you Uncle Sam!!

I think this stencil kicks ass. I made her photo hi-contrast in Photoshop. Next, I went through, making sure there were no islands that would make printing difficult. The hair highlights and part of the eye were from a separate stencil. I'm still using Adobe Streamline to turn my TIFFs into vector art. (Is there another way? It sucks because I have to use System 9 when using Streamline.) My Silhouette Digital Craft Cutter was used to cut the stencil out of index paper. They've created an Adobe Illustrator plug-in that gets the job done nicely. I used blue masking tape to define the boundaries, tearing the edges to give a more organic look. I think it's very successful . . . well, not the date . . . just the final product.